As a former wedding and portrait photographer of 10+ years, I know the quality and professionalism that hiring a photographer can bring to your business. Sometimes though, time and/or budget may not allow that. Today, we are sharing with you tips on taking beautiful headshots and portraits using the iPhone portrait mode.
There are three components to remember when taking portraits whether you use portrait mode or not and they are: lighting, setting, and posing. These are all connected and will help you take some pretty amazing photos!
Portrait Mode? What are you talking about?
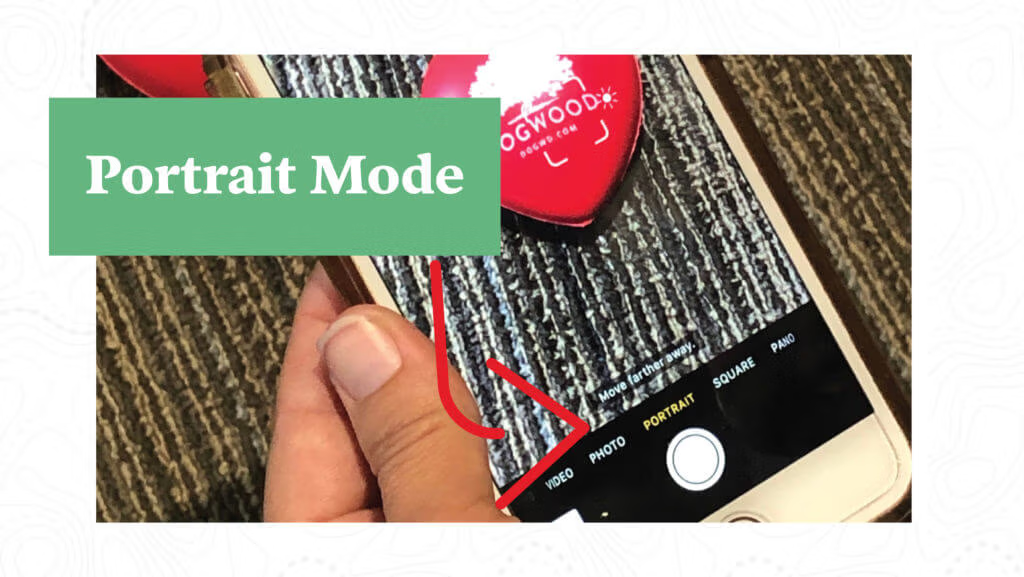
When you open your camera app on your iPhone, you will see several options “Photo,” “Video,” “Slo-Mo,” and a few others. “Portrait” is the amazing new feature we will be discussing in depth today. Now, if you have an older iPhone you may not have this feature. Portrait mode is available on iPhone 14, 13, 12, 11, 11 Pro, 11 Pro Max, XR, XS, XS Max, X, 8 Plus, and 7 Plus.
The Portrait feature is dependent on this incredible twin-lens camera setup. If you don’t have a portrait mode and you really want it, you will have to upgrade your phone. Don’t quit reading though – many of these tips will help you take better pictures whether you have the Portrait Mode setting or not.
Recent Updates to iPhone Portrait Mode
Technology advances quickly and some new features to the iPhone have given us some amazing updates on portrait mode that you may not know about.
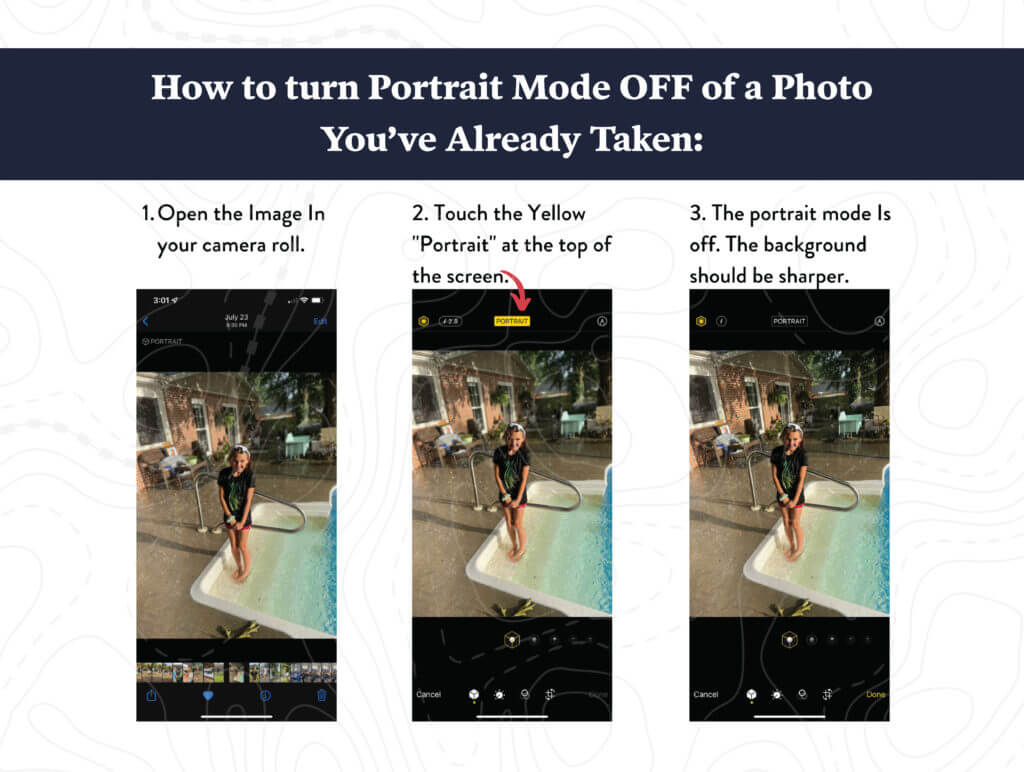
Toggle from Portrait Mode to Photo Mode after taking the photo!
The beautiful effects of portrait mode are usually what we prefer but there is some cases where we don’t. If you have already taken the photo in portrait mode and want to see what it would look like without the blurred background and other effects. In the camera album, click edit, then tap the word “portrait” off at the top and you can see a crisper clearer background than before. If you like the effects then click save. If not, toggle it back to portrait and click save.
Use Portrait Mode in Selfie Mode, Facetime, Facebook, Instagram, and More!
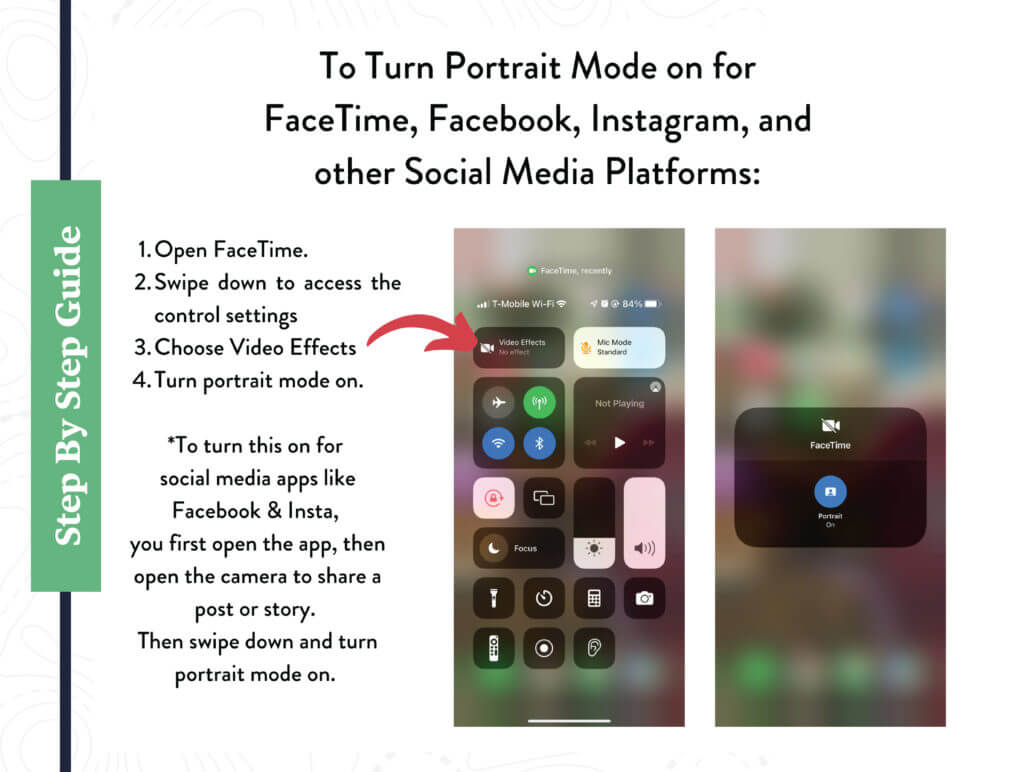
You can now apply that beautifully blurred background to your selfies, in Facetime calls, and while creating posts and videos (yes I said video!) on social media. This is thanks to the most recent ios 15 updates so if you have not updated yet, you will want to in order to use these features.
To use portrait mode in other apps, you must manually turn it on. Below are the steps to turning on portrait mode for Facetime. To turn Portrait mode on for Facebook, Instagram, and other social media sites, you must first open the camera in the app and then repeat the steps below.
Let’s talk about Lighting
Today we will focus on taking your headshots outside. If you are looking to photograph products, visit our post Product Photography Using Your iPhone, and if you are looking for more tips on using your iPhone for indoor photographs visit our post: More Tips and Tricks for iPhone Photography.
Just because the sun is out and the sky is clear does not mean that the lighting is right for your picture. Standard business hours usually do not include what photographers deem “the golden hour” except for certain parts of the year. The Golden Hour is the last hours before sunset (or the first hours after sunrise)
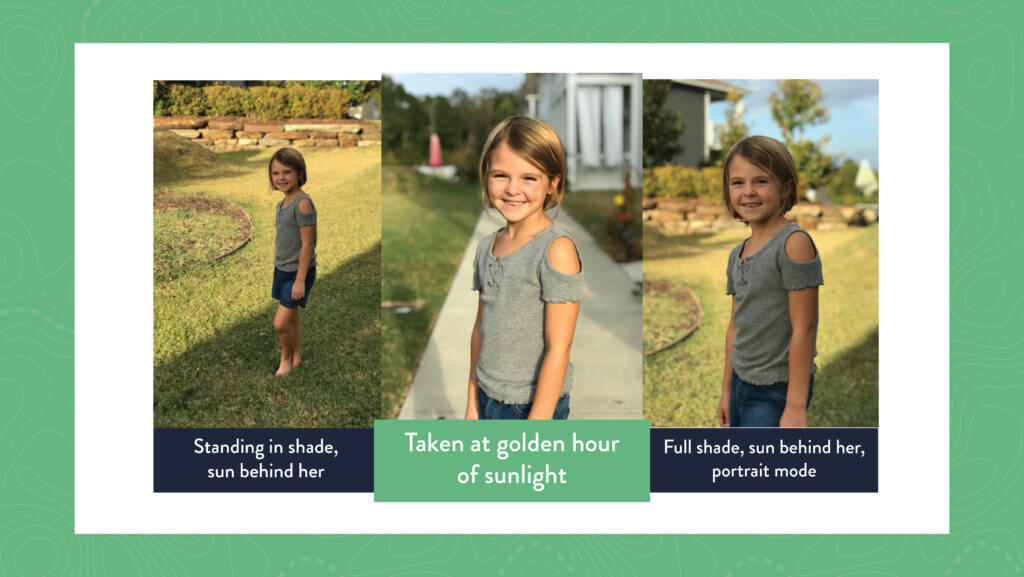
So, what do we do? Find a spot where the sun is shining behind your subject (the subject is the person you are taking a picture of) but it’s not shining right down on them. No one wants to squint in their pictures because the sun is so bright. The dark shadows on eyes from the direct overhead sun are not flattering to anyone either. You want to find a solid shady spot with the sun behind them. When I say solid shade, I mean no bits of sun that are peeking through leaves and making a weird single bright spot on faces, necks or shoulders. Trust me, it will just look weird. So solid shade with the sun behind them. If it is a partly cloudy day you are in luck because you can take the picture just about anywhere.
In the series of pictures below, the left shows my first set up in the solid shade with the sun behind her, the right is the same image in portrait mode, and the middle was taken at the beginning of the golden hour of sunlight (notice it is not TOO harsh on her eyes. Any earlier and it would have been.) Experiment and these directions will make better sense.
Let’s talk about the Setting
Portrait mode works best when you have a little room between the person you are photographing and what is behind them. If you put them right up against a brick wall, then Portrait mode is not going to be able to put much depth between them and the wall so your image will not turn out the best it could.
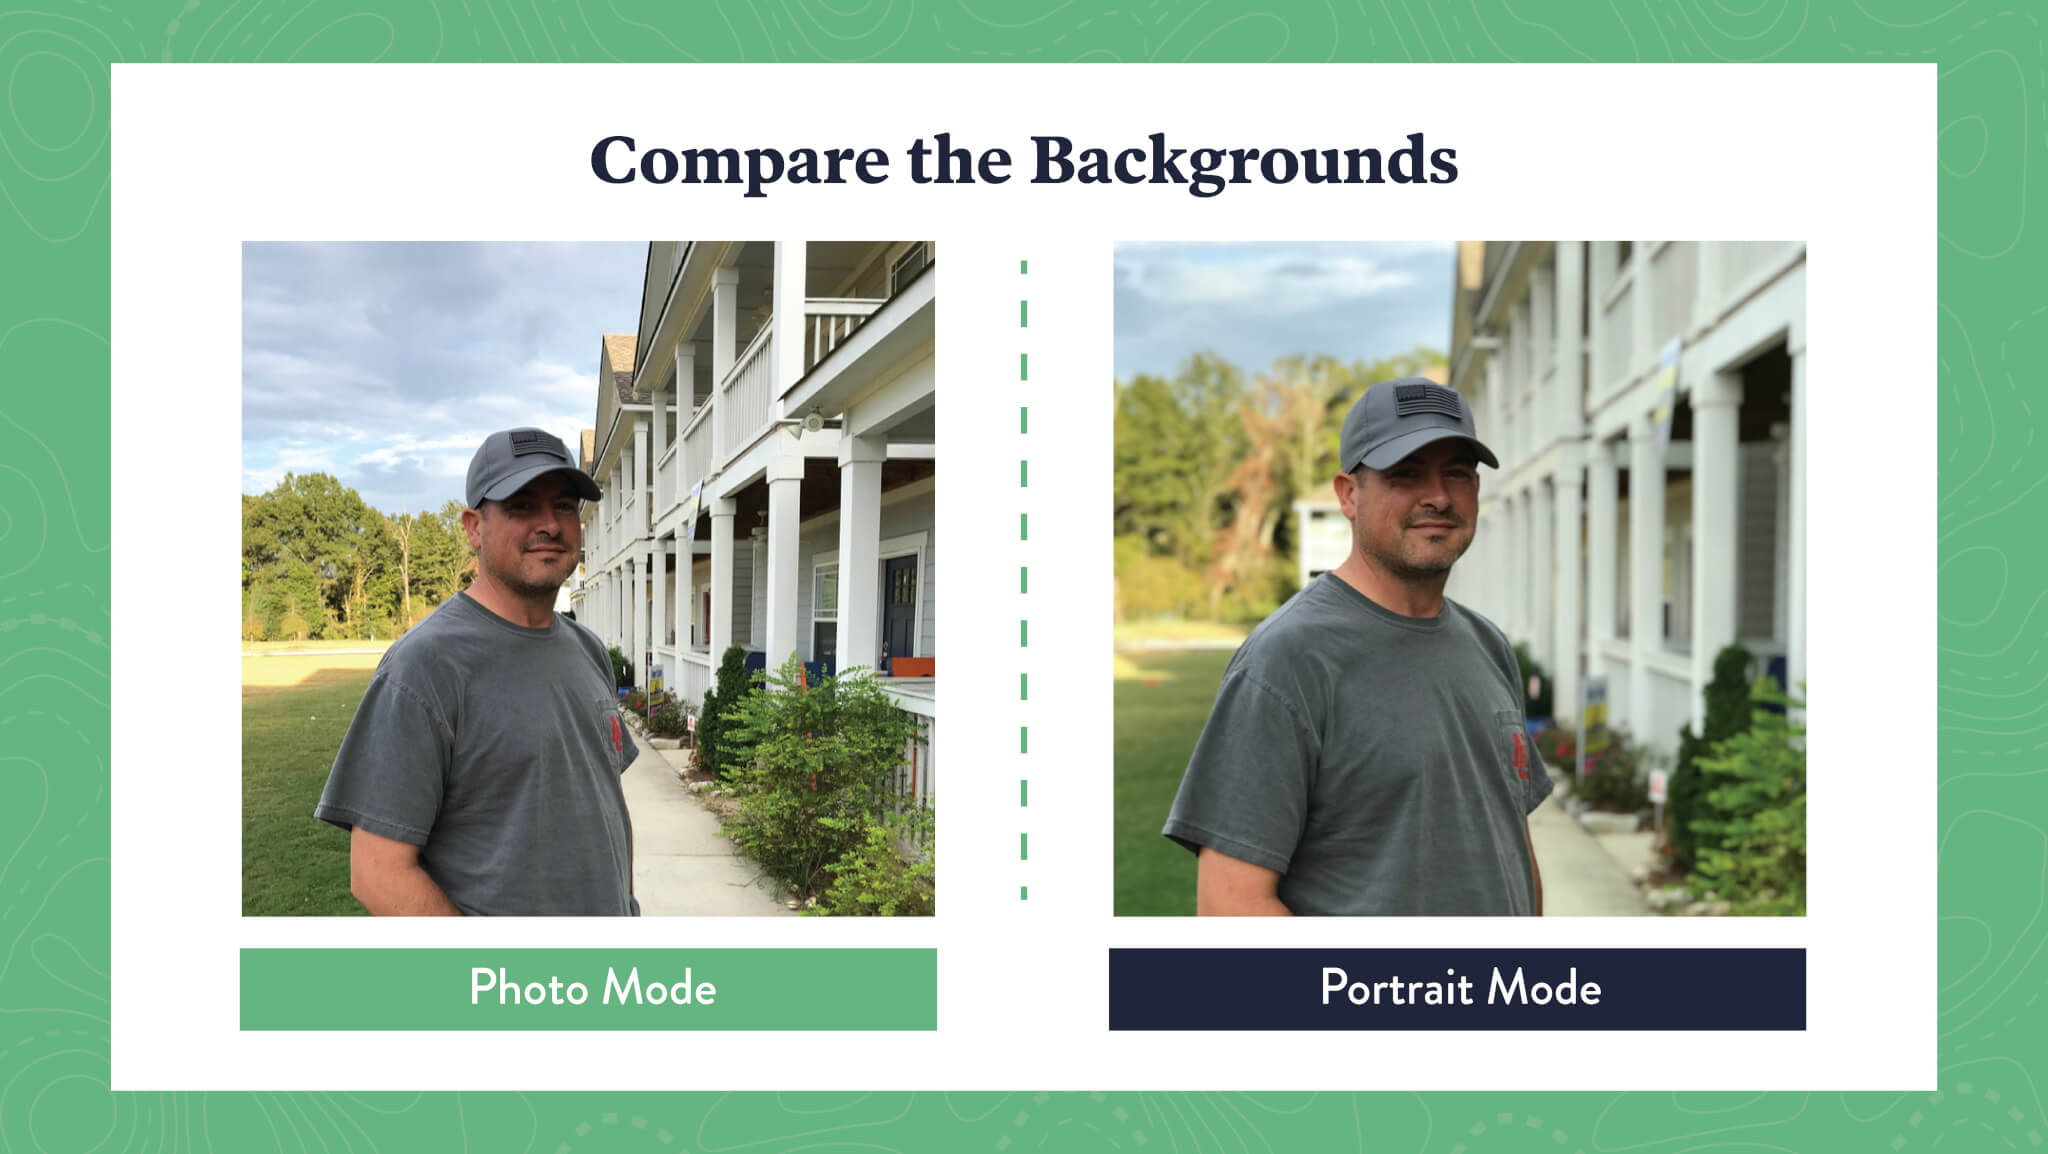
Portrait mode creates a beautiful “bokeh” blur of the background. This creates dimension, removes distractions, and covers any possible mishaps.
Check out the examples below.
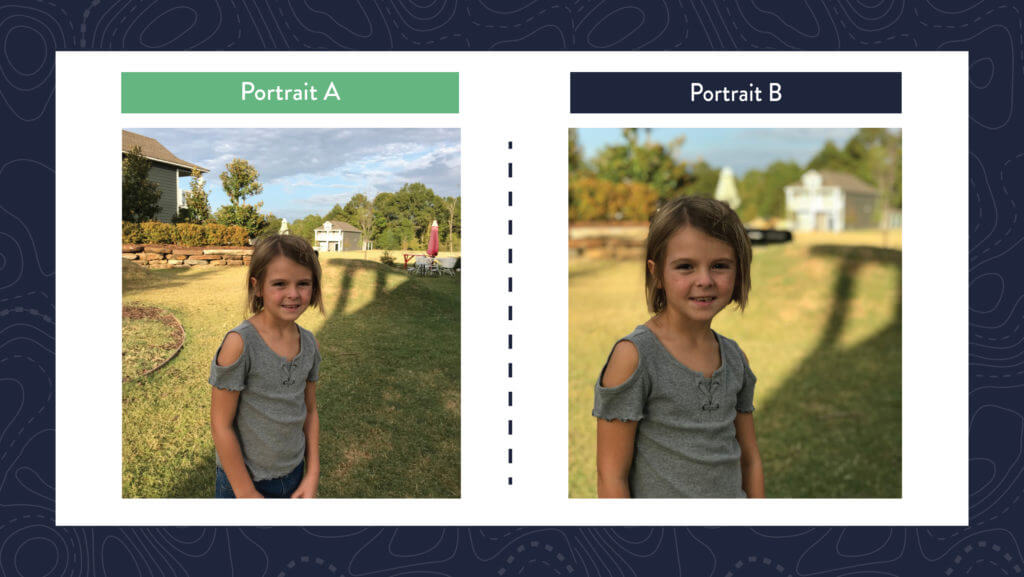
Even though Portrait mode does blur the background, you still have to think about what is going on behind your subject. In the example above of Portrait A vs Portrait B, Portrait A at first glance looks as if she is wearing a tiny green pointy hat (an umbrella) and also has many distracting shadow lines competing for attention. Portrait B taken in iPhone Portrait mode has blurred the tiny green hat umbrella but also blurred the giant black tube the kids play on to where it looks like a black mass growing from her head. Even though the background is softened, take into account what is happening around your focal point.
Look how the background just fades away and the subject pops in iPhone Portrait mode. (This is my husband!)
Let’s talk about Posing
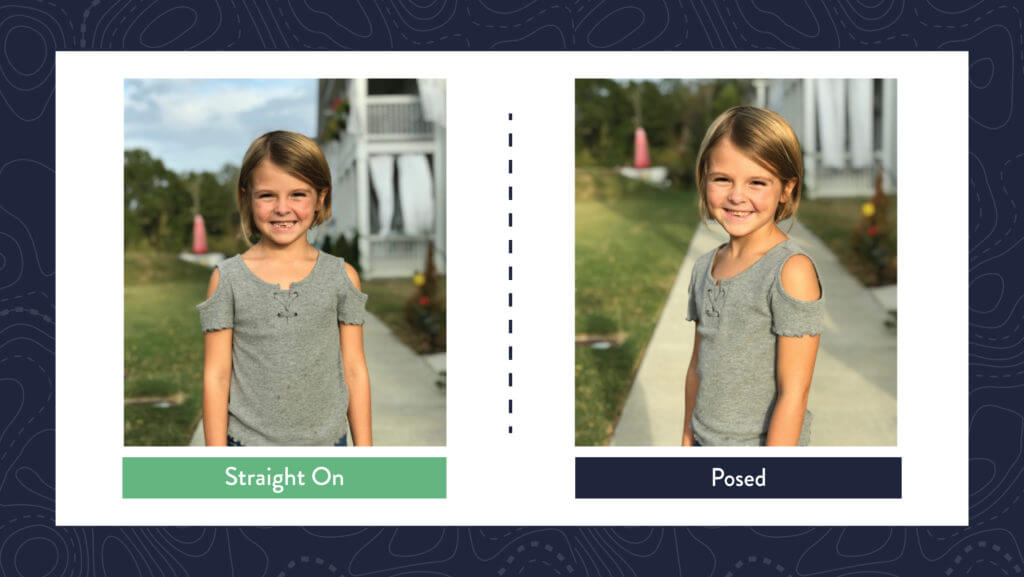
Think back to high school football team pictures. The team is sitting or standing square to the camera and lined up shoulder to shoulder. These guys want to look as big and wide and strong as possible. Well, the average person does NOT want to look as big and wide as possible…they want to look the opposite. Now there is no magic setting to make you look skinny, but here are a few tips to give the most flattering angles when posing for headshots and portraits.
- Always stand slightly angled at the camera and never straight on.
- Put most of your weight on the leg farthest from the camera and bend your front knee slightly. (Yes, even if it is a head and shoulders-only shot) Ladies the weight should be about 80% back leg and 20% front and men should be about 60/40.
- Slightly bend your elbows.
- Bring your nose to the camera even with your shoulders angled a bit.
My daughter is cute no matter what but look at how posing the right way just softens and relaxes her in the images below.
Final Bonus Tip
Portrait Mode takes gorgeous dog pictures! The best pictures are made when they are relatively still. These are a couple of our Dogwood Dogs – Piper and Caspian.

While iPhone photography is becoming more and more commonplace on websites and social media, there are still times when you need a professional camera and photographer to run it. If you would like professional photography and/or videography services, Dogwood can help. Contact us today to learn more.
This article was first published on October 10, 2019, and has been updated to reflect new features and new information.

 by
by