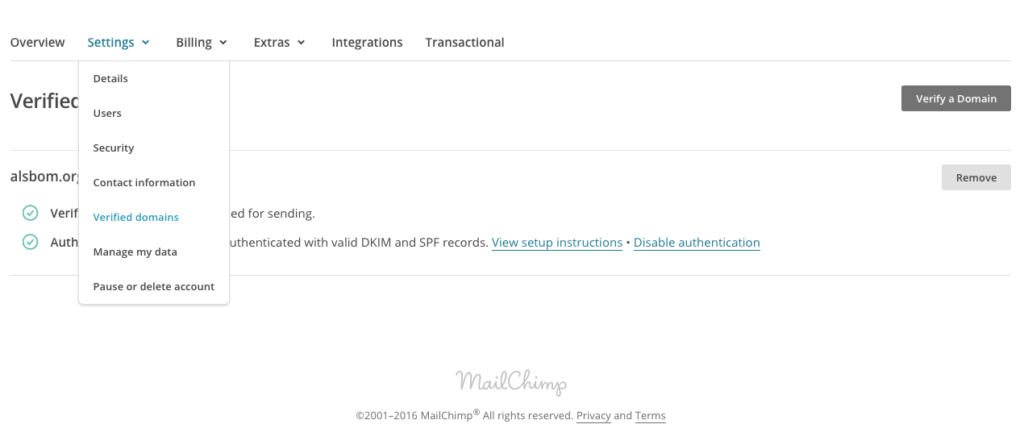
Recently I discovered another reason to love MailChimp…the ability to not only have your domain verified but also the ability to authenticate your domain with your domain provider.
Have you verified and authenticated your domain?
Email companies like Google, Yahoo and Microsoft want to verify that you are who you say you are because of those nasty spammers. Plus you want people to read the email marketing messages you send, correct? This is another tool to prove that the emails you send from your domain are real…thus in theory, increasing your open rate.
It took me longer to write this blog post then it did to actually follow these steps so hang in there. It’s quick, easy and should really pay off for your next email marketing campaign.
Couple things you’ll need to be able to do this:
- Access to your domain provider. I was a big GoDaddy guy for a while but I’ve recently begun the switch to Google domains. I also use Name for some other accounts…whatever you use, you’ll need to be able to log in and add some records to your account. For the purpose of this blog…I’m just talking GoDaddy.
- Access to your MailChimp account and at least a manager level of authority. I’m assuming you have this if you’ve read this far anyway!

Here’s the domain verification process:
- In MailChimp, go to Account >> Settings >> Verified Domains.
- Click on verify domain.
- Enter your email address that contains your domain name in it. Example – [email protected].
- Respond to the email that appears in your box.
- DONE!
Let’s authenticate your domain now:
- In MailChimp, go to Account >> Settings >> Verified Domains.
- Click view setup instructions.
- Open your domain provider to the domain we are authenticating. This is the same domain by the way that’s in your email address.
- This is where it can vary from provider to provider. In GoDaddy, click on DNS Zone File then add a record.
- Choose to create a CNAME record.
- In the “Host:” field, enter the first section of information that MailChimp provides.
- In the “Points to:” section enter the information provided in the first highlighted box that MailChimp provides.
- After clicking finish, make sure you save this change.
- Choose to create a TXT record.
- In the “Host:” field, enter your domain.
- In the “TXT Value:” field, enter the information provided in the second highlighted box that MailChimp provides.
- After clicking finish, make sure you save this change. You are done now with your domain provider.
- Go back to MailChimp and click “Authenticate Domain”.
- You should receive a notice that your domain has been authenticated at this point!
That’s it. Now, get busy working on that next email marketing campaign and hopefully, you’ll see a boost in your open rates!
Need help doing this still, contact us.


